2017 in Review

I never feel as if I’ve done much in a year until I go back through the blog and see everything all in one place. Somehow at once 2017 flew by, but completing Snow White and Luna seem to have happened years ago. I was actually surprised when I looked back at the beginning of the year and saw them there! Go Figure. Here I’m going to look back at what I’ve done in the past twelve months, and tell you a bit about what’s coming in the next twelve!

What I did in 2017:

Snow White

IMG_2874IMG_4039

Photos by Ben Marcum Photography

I’m absolutely thrilled with how this cosplay came out! I’m going to add some wires to the front at some point so that the collar can be shaped more. It looks good in these photos because this is the first time I wore it, but it has gotten a bit crushed now. I did enter this one in the costume contest at Cincinnati Comic Con, but no luck! I may try it again elsewhere.

Brandon’s Regency Fashion Plate

green-coatimg_279819260647_10209214040849386_7917985655439016741_n

Brandon’s Christmas present from 2016! I finished the pants and made the coat in January 2017. We do have plans to add another row of buttonholes to the jacket so that it can be worn folded open as well as closed. Still adore that blue stripe down the pants. I’ve seen fashion plates with a red one too, so I’m tempted…

Luna Lovegood (Half-Blood Prince)

IMG_2940IMG_2997

The second legwarmer is actually finished now! No good photos of this one yet, but we’re waiting to do a photoshoot until Meredith’s (you may remember her as Margaery) new Hermione wig is done so that we can do photos together!

1870s Underthings

IMG_3228IMG_3506IMG_3509

All ready for beautiful things to be made over them! I do already have plans for a new Victorian corset, but the way my schedule is looking, it will be 2019 before that happens!

Two Tambour Lace Pieces

Tambour is my favorite demo to do while interpreting the early 19th century. I have big plans for the upcoming year, so stay tuned below!

1870s Ravenclaw Underskirt

IMG_3760

The problem with bucket list projects that aren’t for any specific event, is they get shunted aside for things that are more time-sensitive. But Ravenclaw is back in gear this month, expect progress soon!

Adora Belle Dearheart & Moist Von Lipwig

IMG_4119IMG_4013IMG_4125IMG_4149

In preparation for the best 1st Anniversary we could ask for (The North American Discworld Con in New Orleans), Brandon and I cosplayed as two of our favorite characters! (Though I didn’t blog about it, I made Brandon’s coat and altered his hat, while he made his trousers and waistcoat.) We won Best Workmanship and Best Overall in the costume contest, and the Hall Contest as well! We can’t wait to hear where the next one will be!

18th Century Stays

IMG_4489

Very pleased with these, though I still haven’t found time to put the lining in!

Columbine 1780s Pierrot Jacket and Petticoat

SC115293IMG_4637IMG_4666IMG_4723

I couldn’t be happier with my first foray into the 18th century–an era which has interested but intimidated me for so long. It was so fun to make and wear, and I can’t wait to wear it again!

Regency Shirt & Waistcoat for Brandon

IMG_4997.jpg

The shirt was a desperate need, as his old one was literally disintegrating more and more with each wear. It’s the first one I’ve made entirely by hand, and I really enjoyed it! I may be posting a blog about it in the next few weeks. The waistcoat was Brandon’s birthday present, which I made in secret, and had his in-character mother give him as a Christmas present at our Christmas event at Locust Grove in early December. He was so surprised–it was really fun!

Coming up in 2018

Number 1: finish Ravenclaw!!! I draped the underskirt on Thursday, and should be cutting  today! It’s really happening!

IMG_2756

It’s going to be a historical heavy year, with only two cosplays planned: A female version of Colonel Mustard from Clue (part of a group that should be really fun!), and Daenerys’ landing dress from Season 7 of Game of Thrones, which I knew I had to have the moment that photos started appearing. There are fabric swatches on their way so that I can start finalizing my plans!

93cb19cd7cb4bfb503c544a3ac81a207.jpg

Other than that, it’s all historical, all the time! I have two new 18th century looks planned (another jacket & petticoat, and a Robe à l’Anglaise), and a whole pile of 1816 plans. I realized I haven’t made myself anything new for the era I spend the most time in since January 2016, and that has to change! I have plans for dresses, spencers, petticoats. The biggest historical project of the year is one I’ve been planning for quite some time, and am finally ready to bring to fruition. A tamboured net evening gown over a colored silk petticoat.

It’s going to take forever, but I’m really excited about it!

All-in-all, it should be a fun year for me, and I hope you’ll enjoy watching!


Snow White Riding Outfit 4: Finishing Touches

I was finally able to get back to work on Snow this month, after my break waiting for the final materials to arrive turned into a break to finish Christmas gifts! Snow is finally finished. I only have dress-form photos at the end of this blog because next week I have a studio photoshoot scheduled, so keep an eye on my Facebook and Instagram for the good stuff!

If you read Parts 2 & 3 of this blog, you know that things were nearly finished–the pants were fronted with suede, the skirt drapes and the jacket were made. All I needed was to bind and bead the jacket, and make the belt. (I’m also making a little costume for my bow, since Snow’s is wrapped in leather and fur, but I’ll show that off at the photoshoot.)

4332d572ba947702f7c65878266f4fcd
Here’s the real costume, designed by Eduardo Castro

It took forever to get a hold of faux leather seam binding in exactly the right shade of off white. It turns out that not a lot of places sell faux leather binding at all, and those that do mostly have tan and black. I finally had to order off white from the seller Neotrims on Amazon (they also sell on eBay), and while it’s the perfect solution, it took weeks to get here–most of the reason for how delayed this blog is!

https://s-media-cache-ak0.pinimg.com/736x/5e/3c/c2/5e3cc253453f047be4590b023befd7ad.jpg

Sewing faux leather binding turned out to be another one of those places where Wonderclips are invaluable. Since this binding is basically just one strip of double-sided poly leather with a slit down the center of one side to facilitate folding, you can’t sew it like fabric bias tape. It doesn’t open up.

IMG_2674.jpg

So I just clipped it onto the edges of the jacket and slip stitched each side. At first I tried sewing both sides at once by putting the needle all the way through the jacket and both edges of the tape, but I lost so much time constantly turning the piece this way and that to make sure the needle was coming through in exactly the right place, and fighting to pull it through that many layers that I decided just sewing each side seperatly would be more efficient.

IMG_2632.jpg

As usual, Marionette was determined to help out by sitting exactly where the project needed to go.

Once I had put binding on the jacket and sleeve pieces, I put in grommets to attach the sleeves to the jacket.

IMG_2638.jpg
Putting in grommets is very satisfying, as it’s one of the very rare times in sewing when it’s acceptable to hit your project with a hammer.
IMG_2649.jpg
Don’t listen to that nonsense on the package about using scissors! I always open up holes for eyelets or grommets with an awl, which doesn’t sever the threads of the fabric, and therefore keeps the hole much stronger. It also alleviates the risk of opening a hole to big for the eyelet, thereby ruining the project.

Here’s the jacket body with binding and eyelets:

IMG_2639.jpg

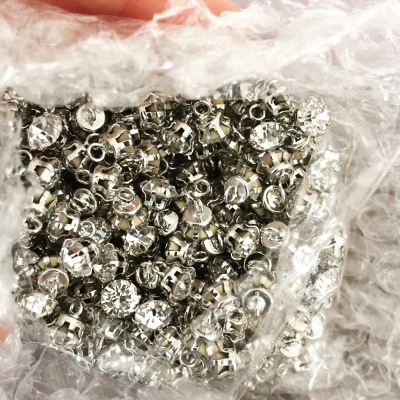
It took me forever to find a bead/stud that I liked for the centers of the diamonds. It is almost impossible to tell exactly what they are either in the show or in any photos of the costume I’ve seen. Eventually, I found these small rhinestone shank buttons on Etsy.

IMG_2538.jpg
Here is a link to the seller’s page.

She didn’t have a big enough listing of them up, but she was very helpful and was able to special order 550 of them for me from her supplier. They were definitely the priciest part of this costume simply due to the quantity, but I think it was worth it.

Beading, as usual, took much longer than planned…

Because I decided to leave beads off of the area under the belt and down the center of the back (to avoid getting them tangled in my wig), I ended up using a total of 424 beads.

I left attaching the sleeves until later and moved on to the final piece of the puzzle: the belt.

I started with measurements. With the jacket on, my waist measures 30″, so I needed something with a 30″ finished length, plus a tail. It needed to be slightly narrower in the center than two of my rhinestone brooches, since they hang over the edges ever so slightly.

IMG_2667.jpg

IMG_2527.jpg
I found these brooches at a shop that sells all sorts of stuff for events, and at less than $5 apiece, I don’t think I could have done better!

To make the belt pattern, I used a piece of stiff buckram interfacing. I measured and sketched out the shape I needed, then cut it out and tested it with the jacket.

After a few minor adjustments, I used that pattern to cut out the outer layer (silver metallic knit from Joann), and an inner layer of muslin, sandwiched the interfacing between them, and basted, leaving one end free to attach the buckle. The other end got two layers of off-white leather for the holes.

I them bound the length between buckle and leather with the same off-white pleather binding as the jacket.

IMG_2672.jpg

While I was putting on the binding, I also added a loop to hold the excess length of the belt. It is a piece of the binding folded in half and sewn into the binding at the back of the belt. It then wraps around the front of the belt, and back under the binding on the other side.

When the belt was finished, I simply pinned the brooches in place.

IMG_2678.jpg

The final step was to attach the sleeve pieces to the jacket. I used a worsted weight cotton yarn since I was having trouble finding any twisted cord of the right size and flexibility. The yarn is tied in a cow hitch (both ends through the grommet, then pulled through the loop left on the other side) around the upper portion, then both ends are put through the corresponding grommet on the lower portion and tied off. The dangling ends are each adorned with a silver beadHere.

Here it is, all finished! I’ll have awesome photos of me in the full costume in a couple of weeks, so check back, or follow me on Facebook and Instagram (@fabricnfiction)!

img_2683img_2684img_2686img_2687img_2688img_2689img_2690img_2691

Edited to add these amazing photos from a shoot with Ben Marcum Photography! Wig by Custom Wig Company.

IMG_2874

IMG_4039

Snow White Riding Outfit 3: Not Just the Jacket

Since I can’t do anything else on the jacket until the binding and beads arrive (cross your fingers for some time next week!), I’ve been working on other parts of the costume instead.

Snow’s pants are your basic stretchy riding pants, but with a false front to make them look as though they are made of suede.The suede piece covers just the fronts of the pants from waist to where they go into the boots. The join is easily visible in the character shots. I assume the costume department didn’t expect anyone to notice that Snow’s pants weren’t all suede, but it’s easy to see in the show with all of the action she has in this costume.

Screen Shot 2016-10-23 at 7.28.56 PM.png

I ordered my pants from State Line Tack. I basically just picked the cheapest pair of light tan riding pants I could find. The faux suede is from Fashion Fabrics Club.

I started out by just cutting two rectangles of suede a little wider and a little longer than I needed to cover half of the fronts. I put on the pants and pinned the suede to it, marking on the suede where the seams were underneath so that I knew where the finished edges of the piece should be. I did this with the pants on because I needed them to be stretched so that I knew everything would fit once the suede was on.

IMG_2459.jpg

I used the first piece to cut out a symmetrical second piece and sewed them together at the center front.

IMG_2468.jpg

I then hemmed all the edges with a double row of stitching, first cutting out the corners so that my poor machine didn’t have to sew over four layers of this stuff!

At that point, all that was left was to attach the false front to the pants, which meant making sure that I had the pants stretched enough. I started by sewing the center front seam to the center front seam of the pants. The pants don’t stretch as much vertically as they do horizontally, so that was pretty easy, and it gave me somewhere to work from.

IMG_2473.jpg

I also checked to make sure the outer edge was hitting about where I wanted it.

IMG_2474.jpg

I put the pants on and had Brandon mark where the bottoms of the false front should hit.IMG_2475.jpg

From there, I sewed them on down the inseam, careful to stretch the pants just a touch so that the ends landed right on Brandon’s line. Then I put the pants on again, and had Brandon pull the outer edge as far as it would go and mark where that should fall so that the suede would be as tight as possible when I had it all sewed down.

Here’s the finished product. I didn’t manage to get it quite as tight as I hoped, but I think the backs of the pants end up stretching a bit more once the suede is on to make up for the fact that the front doesn’t stretch as much anymore. Oh well, at least most of the loose bits will be covered by other parts of the costume!

IMG_2496.jpg
For some reason teh pants look very yellow in this photo. In reality they are quite a bit browner than the waistband.
Screen Shot 2016-10-25 at 9.22.57 PM.png
The boots are Yuu Soo Riding Boots from JC Penny

After the pants I moved on to the skirt drapes. They are made of pincord fabric, and lined with the leftover suede from the pants to keep them stiff.

After making a basic waistband, I draped them on my dressform, careful to keep a large seam allowance around the edges so that I could wrap them around the lining and finish. They are very simple shapes, just wonky rectangles with one little pleat in the front and one in the back for shaping and drape.

IMG_2490.jpg

The fabric is the same size as the lining at the top, but gets wider as it goes down so that it has a bit of drape separate from the stiff lining. Since that meant I couldn’t pin them together laying completely flat, I attached the two by pinning the seam allowances away then lining up the lining piece with each edge and wrapping the fabric back around it before pinning in place.

IMG_2491.jpg

IMG_2488.jpg

IMG_2492.jpg

Once the sides were pinned, I fiddled around a lot with the placement of the pleats until they fell as straight as I could get them.

IMG_2493.jpg

I couldn’t sew the fabric and lining together until I was happy with that, or I’d just have to rip it out again.

IMG_2494.jpg
Folding under the raw edges in preparation for hemming.

Since, after all of my futzing with the pleats, the lining edges and fabric edges don’t line up exactly at the very bottom, I both top stitched the edges and hemmed. This ensures that the edges stay nice and sharp, and the fabric doesn’t balloon away from the lining oto much.

IMG_2512.jpg
The finished pieces ready for the waistband. I swear that pincord wrinkles if you look at it.

Since the waistband won’t be seen at all in the finished costume, I was able to just top stitch it shut instead of doing a nice slip stitch, which saved a bit of time.

Here’s the progress so far (sans pants since the dressform doesn’t do that):

img_2515img_2516img_2517

Maybe steaming those darn drapes will get the wrinkles out. It seems like every time I set them down and pick them up again, they’re a mess!

There won’t be a blog next week, since I’ll be too busy getting ready for our Halloween party to get much done, plus it’ll give the final materials a chance to get here. There’s not much I can do until the seam binding and beads arrive! Things should really get fun once that happens!

See you in November,

Hannah


Snow White Riding Outfit 2: A Change for the Better

I wasn’t sure whether I would be able to get this post out on time, since there has been an enormous change of plans! Last week, after I posted the blog, a reader who has made the costume before told me where I can find the screen accurate fabric (Robert Allen’s Diamond Tuft upholstery fabric). At the beginning of my research, I had tried to look for the fabric using many combinations of the words “diamond” “upholstery” “fabric” “suede” “velvet” “velveteen”, etc… but it somehow never entered my mind to simply search for “screen accurate snow white fabric”. Turns out many people had already done the work for me!

IMG_2415.jpg

So, I’ve scrapped the quilting (which was about to drive me up the wall anyway), for the real thing! Luckily I am both small and short, so I was able to order just one yard of the 54″ wide fabric. This meant I got to order it right away, instead of waiting for my next check. I laid out the fabric on the floor in many configurations and used a measuring tape to make sure I could fit it all in before I ordered.

It only took it a few days to arrive and I got cutting.

IMG_2428.jpg

It’s amazing how easily a jacket goes together when you’ve been psyching yourself up for weeks of quilting, and then having to deal with the hand-quilted fabric.

IMG_2429.jpg
The infamous curved dart before pressing.
IMG_2430.jpg
And a finished front piece with both darts.

I didn’t interface the body pieces, because I want them to be nice and flexible, but I did back the sleeves, collar, and bottom tabs with canvas so that they are sturdy and don’t flop or crumple too much.

IMG_2431.jpg
First I pinned the canvas to the fabric.
IMG_2432.jpg
Then I trimmed the canvas away from the seam allowance, since I don’t want the seams to be double thick.
IMG_2433.jpg
I stitched along the top and the bottom, inside where the binding will go on the edges.
IMG_2435.jpg
I catch stitched the loose edges to keep them from getting bent out of shape inside the sleeve. After this first one, I did this before sewing the sleeve into a tube.
IMG_2456.jpg
The completed (sans lining and binding) lower and upper sleeves.

I was away in Cincinnati with Brandon visiting our friend Melissa this weekend, so I wasn’t sure how much of the jacket I would actually have done at this point, but we got home around four, and I went for it! It was so exciting to see it all coming together!

IMG_2446.jpg
The front and backs put together.

I backed the tabs in the same way as the sleeves, though since I was only leaving one short edge loose, I didn’t bother to catch stitch.

IMG_2447.jpg

The backing and lining of the collar are cut in single pieces, but the outer fabric I cut as two pieces so that I could line up the diamonds exactly how I wanted them. Once the collar is attached and the edges are bound there should the center of a diamond (and one of the dangling beads) right where it all comes together.

IMG_2448.jpg

IMG_2450.jpg
Pressing the collar seam.

I took this picture to check that the edges of the collar were falling where I wanted them, and ended up trimming them back a bit more.

img_2451

With the collar attached, it’s time to add the final component: the tabs.

IMG_2452.jpg
The are all just a little bit detached from each other to leave room for the belt to cinch everything in a bit.

The jacket is now definitely a jacket! I have ordered faux leather seam binding for the edges in what I hope will be a close color, if not I will paint it. It’s easy to find white, and easy to find tan, but it turns out that finding a good off-white is not so easy!

img_2453img_2454img_2455

In the meantime, I can work on the pants and on the large skirt pieces, as the fabric for those got here at the end of the week. The beads that I ordered are also on their way. This might just happen by the end of the month after all!

Tune in next week!

Hannah


Snow White Riding Outfit 1: What did I get myself into?

There are a couple of new cosplays I’ve been hankering to make for a while now, and now that the wedding is over, I can finally begin.

First up is one I’ve been planning since I started cosplaying a year ago: Snow White from Once Upon a Time. As much as the show I once loved has become a show I love to hate, I do still love this character (probably because she’s one of the few who has retained her not-just-a-copy-of-the-Disney-character status), and while she has certainly had some fashion missteps (as has everyone on that show), by and large, she gets some pretty wonderful costumes. I’m embarking first on one of my favorites:

4332d572ba947702f7c65878266f4fcd
Snow White played by Ginnifer Goodwin, Costume Design by Eduardo Castro

Since I have had multiple people stop me in grocery store lines and other random places to tell me I look like “that chick from Once Upon a Time,” it seemed like it was time to go for it.

Technically, work on this cosplay began back in April, when I made the wig:

We got extra lucky on this wig, because a beautiful high-quality hair was on sale in exactly the right color at just the right time, so it’s extra soft and silky. The wig will soon get to be used for its intended purpose, but in the meantime it has still been busy–the length and silkiness of the hair makes it a perfect wig for the 1840s!

As with all costumes, I first sat down and did a lot of staring at pictures, watching scenes, and planning. This mostly involves asking lots and lots of minute questions.

  • Her jacket has a soft texture. Is it suede, velveteen, or wool?
  • What are the large skirt-like panels made of?
  • What are the beads on the jacket? Do they sparkle?
  • Should I buy or make the pants?
  • Is the pattern on the jacket quilted or embossed?
  • Can I find leather/pleather seam binding in exactly the right shade of ivory, or do I have to make it myself?
  • How big are the grommets that hold her sleeves?
  • How are the sleeve cords tied?
  • Why didn’t whoever took the character shot edit out the tape spike on the floor? (Not relevant to the costume, just a question I have.)

And so on and so forth…

Some of these questions can only be answered by seeing the costume move onscreen, and some of them can’t be answered at all without seeing the costume in person. So, at the end of the day, I have to decide how I can most effectively reproduce the look with the information I have.

I don’t like to embark on a costume until I have the answers to at least most of my questions. I also like to know where all of my materials are coming from. I don’t want to get halfway through a project and suddenly realize that I can’t find the right fabric for one of the pieces, since that would put all the work I had done on hold until I found it.

The standout piece in this costume is, obviously, that jacket. I has so many stunning details! The beads on the sleeve attachments! The dramatic collar! The diamond pattern! The sparkly bit in the center of each diamond! I was very excited to get started.

After going back and forth many, many times, I decided to make the jacket out of cotton velveteen, and quilt the pattern into it.

While the velveteen was on its way, I started draping using a random scrap of upholstery fabric from my stash.

IMG_2360.jpg
One of the trickiest things about the jacket is that large front dart. Rather than being straight, the dart seam is bent to follow the shape of the front edge of the coat. I had to fudge the line while draping, then adjust it flat while making sure to take out the same amount of fabric as I had on the dress form.
IMG_2361.jpg
I cut the shape into one side of the back on the dress form, then folded it over and cut the other side so that it would be symmetrical.
IMG_2362.jpg
The darts sewn in the mock-up, though not pressed yet. You can see how the dart follows the shape of the piece.

Next I draped the tabs at the bottom, but I don’t have pictures of that because I was busy live streaming it on my Facebook page! Head over there if you’d like to check out the process.

I draped the collar with canvas so that I could really see how the shaping at the points would look. The collar is all draped as a single piece, and has to blend in very gently to the front in order to create the correct shaping of the neckline.

IMG_2368.jpg
The left half is the original piece I draped, the right half has been trimmed and shaped to my liking.

The sleeves are just two very simple shapes that are held to the body of the jacket and onto each other with strings. I ran out of my original orange scraps and moved on to some green ones.

IMG_2411.jpg

The fabric hadn’t yet arrived when I finished draping all of the pieces, so I moved on to drawing out the quilting pattern. I started by blowing up a high resolution photo until the front tab was the same width as the piece I draped, so that I had an idea of what size the diamonds needed to be.

IMG_2370.jpg

I measured out each line and drew the pattern on a large piece of tracing paper so that I could transfer it to large areas of fabric without need it to move the pattern around too many times.

The velveteen arrived! I cut the pattern out in velveteen, batting, and muslin for lining, so that it gets nice and thick and squishy when quilted.

IMG_2379.jpg

IMG_2382.jpg
I transferred the design to the muslin lining by pinning the pattern to it, and shining light from my phone behind it, then tracing the lines with a pencil.

It took me a few tries to figure out the best system for quilting all those tiny shapes. I did all of the outer diamond lines first, since they can be stitched straight across the piece from edge to edge. The largest inner diamonds came next. Each one has to be stitched individually. It first I was just jumping from one to the next, leaving all of the thread ends where they were to be dealt with later, but it didn’t take me long to realize that that was going to be overwhelming when it came to it. I started pulling the thread ends from each diamond through to the back and trimming them as soon as I finished stitching. This made whole pieces much less cluttered and easier to work with.

IMG_2385.jpg
You can see that things were becoming a bit of a mess before I started trimming as I went.

The next size of diamond was done in exactly the same way.

IMG_2399.jpg
You can see a few places where the thread got caught and wouldn’t come through (I’ll trim them closer than this), but for the most part everything is much neater.

The final small diamond and the horizontal lines that flatten down part of the diamond pattern will have to be done by hand. There are too few stitches in each of those lines to make it worth starting and stopping the machine and deal with the thread ends every time. By hand, I can stitch the lines, the diamond, and the central bead with a single thread.

IMG_2401.jpg
Here’s where I am now: getting the pattern transferred onto more pieces while watching Pride and Prejudice!

I had better get back to quilting! I had originally hoped to have this costume done for our annual Halloween party, but all this quilting is making that look like a crazy idea! Unsurprisingly, it turns out I’m nuts and set myself crazy tasks. I’ll see you next week with more updates!

Hannah