As you may have realized by now, I really enjoy adapting clothing from fashion plates. Sometimes I follow them very strictly, sometimes I use them as more of a jumping-off point for my ideas. One of my favorite online resources for Regency costuming is the magazine Ackermann’s Repository, which is available in its entirety on Internet Archive. Ackermann’s is more properly called The Repository of Arts, Literature, Commerce, Manufactures and Politics, and was published by Rudolph Ackermann between 1809 and 1829. As you can see from the title, it is a very generalized magazine, which makes it a great resource for many aspects of Regency culture. Each issue includes serialized stories, news articles, meteorological reports, manufacturing news, reviews of new music, book recommendations, images of interesting places around the world, information about fashionable architecture and furnishings, and two women’s fashion plates, in addition to many other interesting things. There are also occasional embroidery patterns, especially in later issues.
I often use the 1814, 1815 and early 1816 issues of Ackermann’s as research for my interpretation at Locust Grove. Though it was published in London, women of the time were extremely diligent about communicating new fashions with their far-flung friends and acquaintances, and a new issue of a periodical could reach Kentucky within three months of publication.

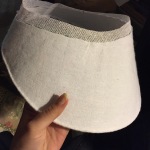
Now, let’s be honest, I have very little experience in millinery, and had no idea how to make that amazing cornucopia shape. After a few minutes of pointless poking around on the internet, I decided to just go for it. I made a narrow base for the hat crown from buckram, then built the rest out of millinery wire and hope.
Before putting on the main fabric–silk satin in this case–I mulled the bonnet with cotton flannel. Mulling helps smooth the lines of the buckram form, and protects the delicate fashion fabric from the scratchy buckram and wire. It wasn’t until after I started mulling the crown that I realized what shape I should have cut the flannel into for it to fit smoothly, but I decided to keep the original shape because the darts gave extra padding, and I figured the all-wire form could use as much padding as it could get. I sort of wish I’d put another layer of flannel on over the first one, but Kentucky gets extremely hot in the summer, and I didn’t want my head to cook.
I only mulled the top of the brim, and wrapped the excess flannel around the edge to protect it. I didn’t use glue anywhere on the bonnet, because I hate working with it, so I used a sort-of pad stitch to secure the flannel smoothly to the buckram. Yes. I was watching some extremely period appropriate Dylan Moran stand up while doing this.
All of the fashion fabric was ruched, which makes covering the bonnet nice and easy, since you don’t have to worry about getting the fabric to lie perfectly flat. Although you could probably argue that getting nice, attractive gathers is just as tricky. The brim cover was a single piece of fabric, gathered into the crown on both sides. The first piece I cut was a bit too short in a few places, so I was forced to cut a new one.
Now, I had originally planned to cover the crown by cutting out a full circle of the satin and gathering it down, but remember how I had to cut a second brim piece because of being silly? So the full circle was not to be. Instead, I had to cut two quarter-circles and sew them together, so I was covering the crown in a cone of fabric. Although the bonnet is finished now, and I do like it, I am considering getting another piece of satin at some point and taking it apart so I can “make it up better” as Lydia Bennet would say. It definitely doesn’t have the amount of ruching I was hoping for at the moment.
I would normally have wrapped the edge of the satin around the buckram base, but since everything was gathered, I wanted to reduce bulk inside the hat as much as possible, so I just folded it under itself and whip-stitched it to the wired edge of the buckram.


 I made the bands by cutting wide strips of the batiste, and folding them in half. Instead of sewing them into a tube before attaching them, I sewed both edges together as I was sewing them to the bonnet. Then it was just a matter of arranging the band into a pleasing pattern of apparently-random gathers and subtly stitching them in place. I ran a gathering stitch under where the other two bands were going to go in order to get as much ruching as I could out of not enough fabric.

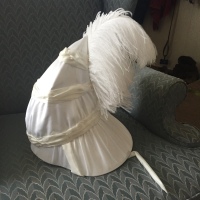
Here’s the finished bonnet from all angles:
And here it is on my head:
I’ll freely admit that my plumes are not nearly as out-of-this-world as the ones in the fashion plate, but baby steps, huh? There should also be a strip of lace along the edge of the upper brim, and I swear I had that piece of lace. But somewhere in the months since I got it, that single yard of lace seems to have wandered away into the ether. I am hoping to find it eventually, but if not, I’ll get around go getting a new piece. Because this bonnet obviously needs more floof. Maybe I’ll do that whenever I finally cover the crown the way I’d originally intended. If that’s the case you can expect a post about that sometime in the next ten years…
Hannah
PS. If you enjoy the blog, pretty please like me on Facebook (Fabric & Fiction), or follow me on Instagram (@fabricnfiction)!


Wow, this is gorgeous! I adore bonnets so much, I must give this a try some day 🙂
LikeLike
Thank you! I’m very much in the experimenting stage when it comes to bonnet-making, so I say go for it!
LikeLike