
The project I was hoping to have done a month ago is finished! Daenerys’ Qartheen dress is officially ready for the runway.
Last week, I described the process of making the belt and shoulder pieces out of brass sheets. You can read all about that here.
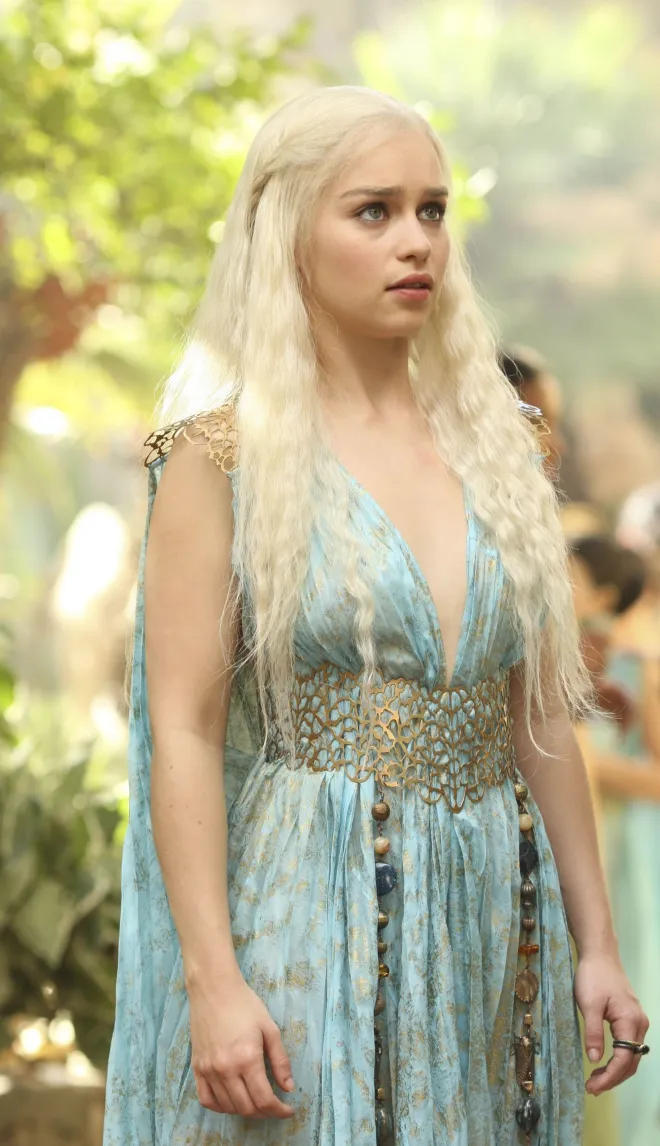
This dress is an interesting one to recreate. The shape is very simple, but the simplicity is a bit deceptive. This is not so much about dressmaking as about pure fabric manipulation. There is no structure to the dress, it all falls straight down from the shoulders and is gathered in by the belt. People recreating the costume get a special treat with this one because there is a shot of the dress before Dany gets into it, and you can see the structure (or lack thereof) of it off of a body. The trick is getting enough volume of fabric, and then controlling in a way that doesn’t turn it into a giant messy poof.
Before I get to that though: the fabric. The dress is sheer, but it is actually quite stiff, which is really apparent when Dany is walking. The dress doesn’t flow around her, it swings and is stiff enough that it appears almost heavy despite how transparent it is. In order to get both the crispness and the sheer, I got 12 yards of undyed silk organza from Dharma Trading Co. My boss, Heather, ended up dying it for me, since she has more experience dying, and it’s a tricky color and fiber. The color is especially hard, since it looks quite different in different lightings on the show. So is the color we ended up with; sometimes I look at the finished color and think it’s too aqua, and then I see it in a different light and think it’s perfect. You can see the variation in all the photos later in the blog. It’s very strange.
The color isn’t all. Once it was dyed, I stamped the gold pattern into it using the base of my palm and a little wire spiral I made. The pattern is pretty loose: there are some sort of wavy stripes in places, and in other places the gold is all over. To try to replicate how the pattern falls on the dress, painted the fabric with stripes down the center and with more abstract gold at the edges. As I went, I stamped a few spirals here and there. I already had an idea of how the dress was going to go together, and I thought that would give me the best pattern placement.


Since I was stamping it all as one piece, I needed somewhere for all that fabric to go as it dried, my solution was a laundry drying rack on top of my table:

Now comes the volume, and how to control it. Every piece of the dress started out as rectangle the width of the fabric, there were no shaped pieces at all. Each piece was doubled up so that there were two layers of fabric. The front is made of two of these pieces, one hanging from each shoulder, so I started by pinning the shoulder pieces to my dress form and arranging the fabric in pleats so that it was the same length as the bar at the bottom of the shoulder.


I pleated this very carefully instead of gathering it because the original dress has a very clear permanent pleat in the fabric all the way down: this is what controls the large volume of fabric without making it look like a tutu. The pleats at the shoulder had to be stacked on top of one another in order to fit all that volume into about four inches. After that, it was just a matter of following the pleats down, pinning as I went, and arranging them over the shape of the dressform. It wasn’t particularly difficult, but it was time-consuming. The result, however, was worth it. You can really see in the process photos the difference between pleating the fabric and leaving it loose.


Once the pleats were all pinned down, I did something that almost made me throw up in terror: I steamed silk. Because the gold already gives the fabric a mottled look, I decided that any watermarks probably wouldn’t show up too much. I got lucky in that it also didn’t de-lustre the silk, so it still has that lovely silken shimmer.


At this point I also sewed the fronts securely to the shoulder pieces, though apparently I didn’t get any pictures of that.
The back panel is one piece (two layers).


The dress also has a cape-like piece that hangs from the back of the shoulder pieces. It didn’t need quite as much volume as the front, so I made each side out of a single width of fabric folded in half lengthwise.

The cape was done in the same way as the front except that it was easier because there was half the amount of fabric and no boobs to contend with.


I hemmed it using the roll-hem feature on my serger. I’ll tell you what, I don’t need a serger that often, but when I do it is invaluable. There were eight widths of the fabric that needed to be hemmed in total, and I think it only took me about half an hour.

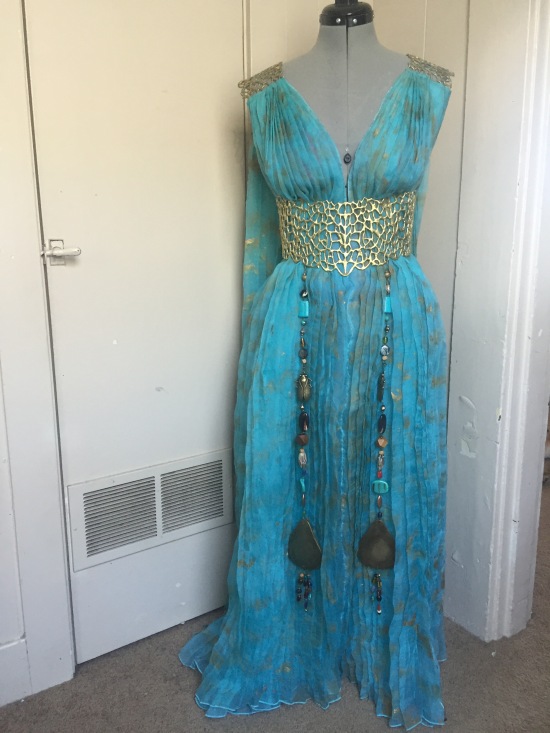
Since I already had the belt done, the only thing left was to make the bead strings that hang from it. Most of the beads I either had lying around or bought from Joann, but I ordered the cicadas from DIYbeads4u on Etsy. They got here yesterday and I was able to finish everything up. I chained the beads together using eyepins that I bought at Joann. I made the hooks out of the eyepins as well because waste not, want not.


Brandon cut these shapes out of particleboard for me, and I painted them.


They get nice little tassels of beads hanging from them so that they really fly around and sparkle when you move.


And that was it. I just got pictures on the dressform for now, because I want to save the whole thing until I can get some good pictures on me (and because I’m still waiting for the stick-on bra and Spanx shorts to arrive). The dress looks at least three different colors in just these photos, and I took all of them in the same place with the same light.


 It will be appearing in public for the first time at Lexington Comic and Toy Con in a couple of weeks! If you want to see photos from the event, like Fabric & Fiction on Facebook, or follow me on Instagram @fabricnfiction!
Hannah
Update: Here are a few amazing photographs by Ben Marcum. There is nothing more fun that doing a shoot with him! If you’re in Louisville and need new headshots, or a stunning portrait that makes you feel better about yourself than you ever had before, he’s the man to go to!


One thought on “Mother of Dragons”